How manually install Kali Linux 2022
Kali Linux establishment is a genuinely basic cycle and you have numerous establishment choices. Most favored ones include:
Introducing Kali Linux by making a Kali (linux) bootable USB drive
Kali Linux hard circle introduce
Utilizing virtualization programming, like VMware or VirtualBox
Double booting Kali Linux with the working framework
While you have different choices to browse, in this article, we will figure out how to introduce Kali Linux utilizing virtualization programming. Following are the beneath expressed advances, you can set up your machine with every one of the apparatuses you really want to play out an extensive entrance test.
Establishment REQUIREMENTS
Least 20 GB of free space in your hard drive is suggested.
Somewhere around 4 GB of smash is suggested when utilizing VMware or VirtualBox
Compact disc DVD Drive/USB Support
Beginning with Installation
Step 1: Install VMware
To run Kali Linux, we will require a type of virtualization programming first. While there are numerous choices to browse, for example, Oracle's VirtualBox, I favor utilizing VMware. When the establishment is done, send off VMware from your applications envelope.
Step 2: Download Kali Linux and check image integrity
To download Kali Linux you can go to the authority download page and select the one that best suits your necessities from that point. Also, on the download page, you will track down a lot of hexadecimal numbers What's more those are not there for no particular reason. Kali Linux is expected to be utilized for security-related assignments. In this way, you really want to check the honesty of the picture you download.
You should check the SHA-256 unique mark of the document and contrast it and the one gave on the download webpage.
Step 3: Launch a new virtual machine
On VMware Workstation Pro landing page, click on make another virtual machine, pick the Kali Linux iso document, select the visitor working framework and design virtual machine subtleties (here, Kali Linux). Start the virtual machine by choosing the Kali Linux VM, and afterward tapping on the green "Power On" button.
The machine will fire up!
INSTALLATION PROCEDURE
Step 1: Once the machine is controlled up, you will be provoked to choose your favored establishment mode in the GRUB menu. Select graphical introduce and proceed.
Step 2: Next a few screens will request that you select region data like your favored language, your nation area and, console design.
Step 3: Once through the nearby data, the loader will naturally introduce some extra parts and design your organization related settings. Then, at that point, the installer will incite for a hostname and area for this installation. Give fitting data to the climate and keep introducing.
Step 4: Set a password for your Kali Linux machine and hit continue. DO NOT FORGET THIS PASSWORD.
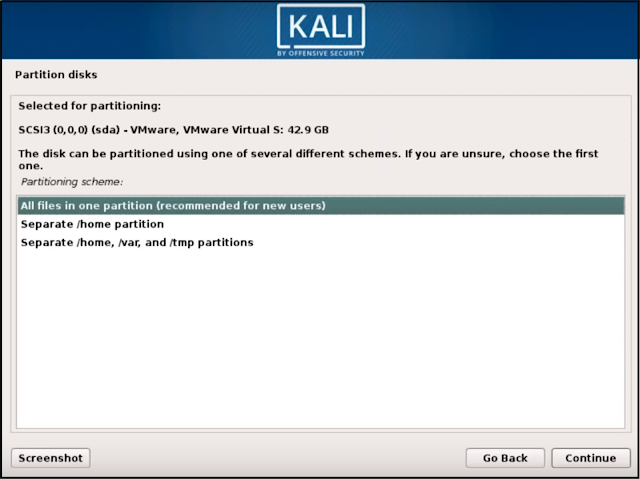
Step 5: Later the password is set, the installer will incite you to establish the point in time zone and afterward stops at the plate parceling. The installer will currently give you four decisions about the parcels of the plate. The most straightforward choice for you is to utilize 'Directed – Use Entire Disk'. Experienced clients can utilize the "Manual" parceling technique for more granular arrangement choices.
Step 6: Select the apportioning disk (the suggested choice is all documents in a single parcel for new clients) and then, at that point, hit on proceed.
Step 7: Confirm all changes to be made to the disk on the host machine. Be aware that if you continue it will ERASE DATA ON THE DISK.
On you affirm the partition changes, the installer will go through the most common way of introducing the records. Allow it to introduce the framework consequently, this might take some time…
Step 8: When the fundamental records are introduced, system will inquire as to whether you need to set up an organization mirror to acquire future bits of programming and updates. Make certain to empower this usefulness assuming you wish to utilize the Kali storehouses.
Let it configure the package manager related files then…
Step 9: Next you will be approached to introduce the GRUB boot loader. Select 'Yes' and pick the gadget to compose the important boot loader data to the hard drive which is needed to boot Kali.
Step 10: Once the installer finishes installing GRUB to the disk, click on continue to finish the installation, it will install some final stage files.
Once the installer finishes installing GRUB to the disk, click on continue to finish the installation, it will install some final stage files.


Comments
Post a Comment